
Saturday morning starts with a small job: mask the window trim before painting the bedroom. Then the tape sticks to itself. The paper slips. One corner folds over. By the time the first wall is ready, the coffee is cold and the room still looks untouched.
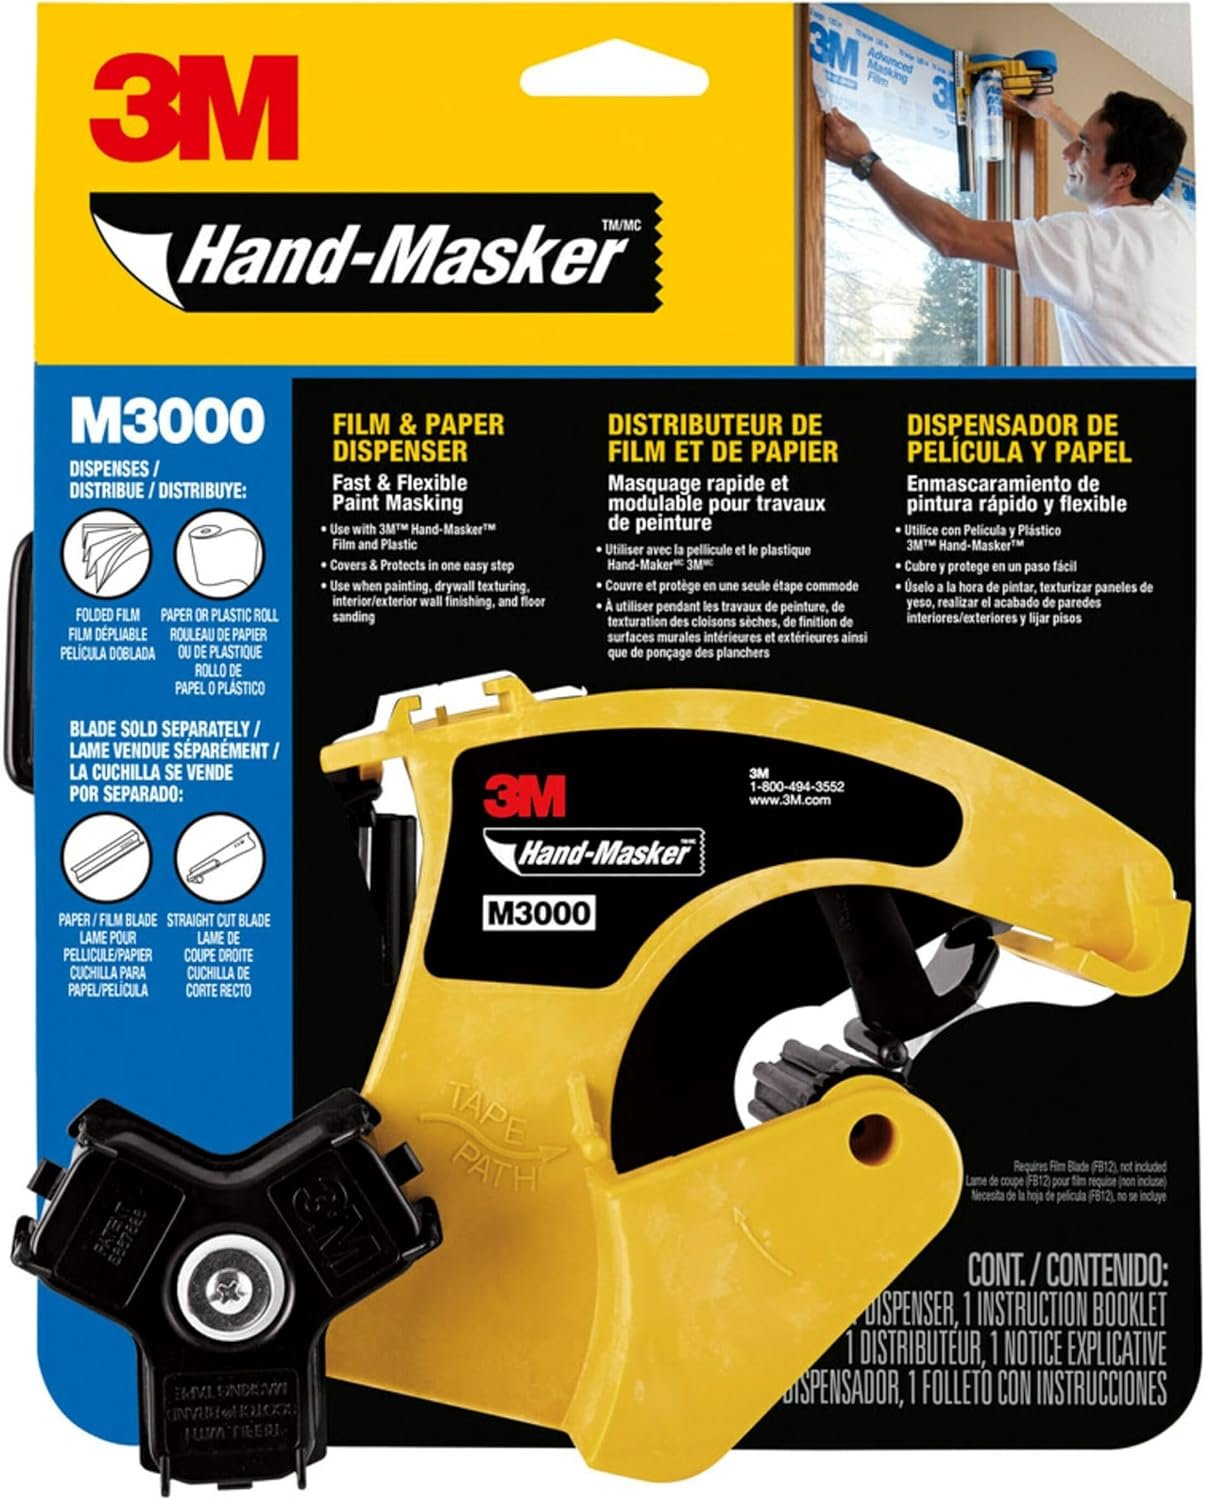
That is the problem the 3M Hand-Masker M3000 aims to solve. This hand masker tool is made to apply painter’s tape and masking film or paper in one workflow. Instead of placing tape first and adding surface protection later, you guide both materials along the edge at the same time.
The key question is simple: does the 3M Hand-Masker M3000 save enough time and effort to justify its price and the cost of compatible supplies? It may appeal to a DIY painter, decorator, or professional contractor. It may also be more tool than a person needs for one small wall.
This article focuses on masking speed, ease of use, material waste, and finish quality. It also separates manufacturer information from firsthand testing. Personal hands-on test was performed for this article, so no made-up times, room counts, or performance results are presented.
What Is the Hand-Masker 3M M3000 Tape Dispenser ?
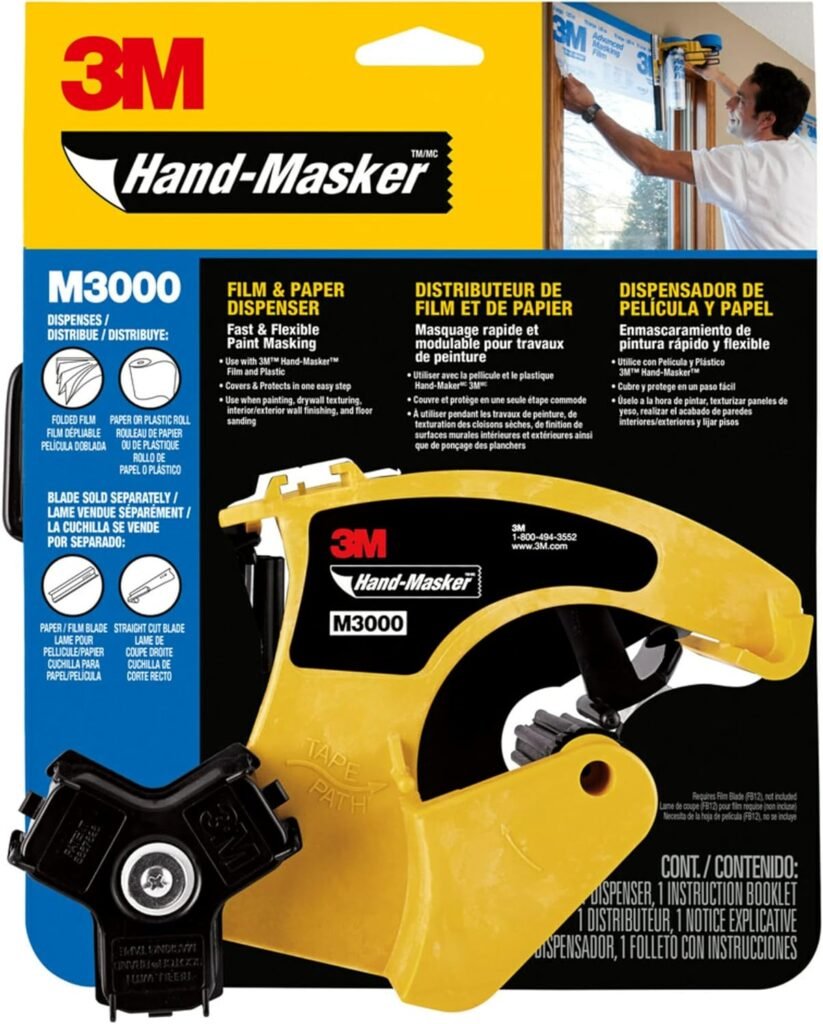
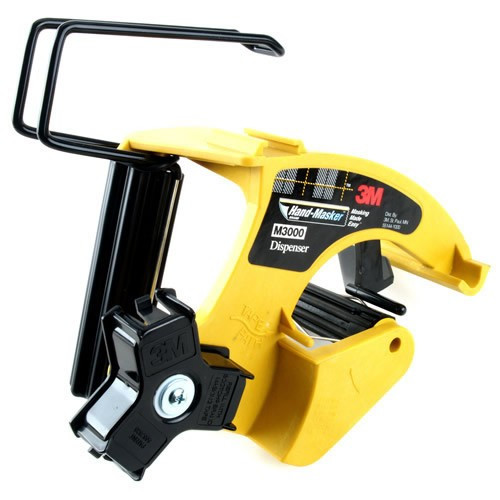
The 3M Hand-Masker M3000 is a handheld masking dispenser for painting and decorating work. It is designed to hold painter’s tape and a roll of masking material, such as masking film or masking paper. As you move the tool along a surface, it helps place the tape and protective material together.
A simple way to picture it is this: the M3000 is a small mobile masking station. It brings tape, film, and a cutting method into one hand-held tool. The aim is to reduce the repeated motion of pulling tape, tearing a piece, setting it down, and then adding paper or film by hand.
The tool fits into the preparation stage of a painting project. You can use it before rolling walls, spraying trim, painting doors, or working near glass and finished surfaces. The quality of the final result still depends on clean surfaces, correct tape, steady movement, and careful removal.

It is not a paint sprayer, edge guide, or automatic machine. It does not make decisions for the user. It also cannot fix dust, grease, damp surfaces, loose paint, or a crooked hand. Think of it as a tool that can make a good masking process faster, not as a replacement for skill.
How the Hand-Masker M3000 works
The M3000 applies masking tape and masking material in one workflow. The tape forms the edge that helps protect a trim line, while the film or paper covers the larger area behind that edge. This can be useful when preparing windows, doors, baseboards, cabinets, and other surfaces.

To use it, the operator must load the correct tape and masking material. The materials then feed through the tool as it travels along the surface. The user guides the tape against the edge and controls the film so it opens in the desired direction.
This combined process may reduce repetitive work. With manual masking, a painter often applies tape first and then cuts, unfolds, and attaches protective paper or film. A dispenser can bring those steps closer together, which may matter when many windows or long trim sections need protection.
The M3000 requires compatible masking supplies. That point matters. Buyers should check the exact M3000 model, tape size, film or paper size, and loading instructions before ordering. Product names can remain in online listings long after packaging, supply options, or seller information has changed.
Compatibility is not only about whether a roll fits inside the tool. The tape must feed well, the film must unfold without excessive drag, and the combination must suit the job. A narrow tape and a wide film may work differently from a wider tape and a narrow film.
Always check current 3M documentation and the seller’s listing. Look for information about supported material widths, replacement supplies, included parts, and whether the listing is for a complete tool or only an accessory. This step can prevent a low-price purchase from becoming an expensive search for parts.
Who should consider buying it?
The M3000 may suit homeowners who paint more than once in a while. If you often refresh bedrooms, repaint doors, protect windows, or work on rental properties, a masking dispenser may earn its place in your storage area.
Professional painters may see more value because repeated masking is part of the job. A contractor who prepares several rooms in a week has a different cost calculation from someone painting one accent wall. Small savings in hand work can add up over many projects.
DIY users who want cleaner paint lines and less setup time may also like the concept. The tool can help bring order to a messy stage of painting. Instead of juggling a tape roll, a film roll, scissors, and a loose paper edge, the painter can use one main tool.
Still, the best user is not simply someone who likes tools. The best user is someone who has enough masking work to repeat the process. For a tiny repair, manual masking may be quicker because there is no tool to load or adjust.

Hands-On Test: What Happens During a Real Painting Job?
A true hands-on review should state what was tested, when it was tested, and what materials were used. It should also report mistakes, delays, and limits. Without those details, claims about speed or comfort can sound more certain than they are.
No firsthand test was performed for this article. For that reason, this section does not claim that the writer masked a bedroom, timed a window, or used the M3000 in an apartment. The discussion below explains what a proper test should include and how readers can judge results from their own work.
This distinction is important for trust. Manufacturer claims can explain what a product is designed to do. Buyer reviews can show common experiences. Neither source should be presented as a personal test unless the writer actually used the tool.
The test setup
A useful test would begin in a real painting space, such as one bedroom with two windows, one door, and several baseboard runs. The test should record the surface type, the condition of the surface, the tape used, and the width of the masking film or paper.

The room should include both easy and awkward sections. A long, straight baseboard can show the tool’s potential for speed. A window corner, door hinge area, or narrow trim section can show where hand work may still be needed.
The test should be done indoors and under normal light. Good light helps the operator see whether the tape follows the edge. It also makes it easier to spot lifted tape, folded film, gaps, and places where the tape has wandered.
A first-time operator should be tested separately from an experienced painter. A new user may spend time learning how to load the tool, hold it, and control the film. That learning time is part of the real cost for a DIY buyer.
The test should record three times:
- Loading and setup.
- Masking the selected area.
- Cleanup, removal, and storage.
The same area should first be masked by hand and then with the M3000. The surface should be cleaned between tests if tape is removed. Otherwise, the second method may benefit from adhesive residue or an already prepared edge.
A fair test should also note waste. Record torn film, unused tape, strips that had to be removed, and pieces cut too short. Waste may matter more than raw speed, especially when high-quality masking film or specialty tape is costly.
What worked—and what did not
Because no hands-on test was performed here, there are no firsthand observations to report about the sound of tape pulling free, the feel of the M3000 handle, or the way its film feed behaves during a long session. Those details should be added only after direct use.
In a proper test, the first thing to watch would be how easily the tape and film feed together. A smooth feed should feel steady, with the tape staying close to the edge while the film opens behind it. A poor feed may cause the film to bunch, fold, or pull the tape away from the surface.
Tape should adhere well to a clean, dry surface. If it does not, the problem may be the surface, the tape, dust, moisture, or an unsuitable adhesive. The dispenser cannot improve tape adhesion on a dirty wall or damp window frame.
Film feeding deserves close attention. Film is light and can act like a small sail. Air movement, static, and a careless hand can make it fold. The user may need to pause, smooth the material, and restart the run.
Balance also matters. A tool that feels fine for two minutes may feel tiring when held at shoulder height. During a longer session, note pressure in the fingers, wrist, and forearm. Also note whether the tool stays stable when the operator reaches across a window.
Corners and narrow sections will likely need extra hand work. A hand masker is made for guided runs, not for every shape in a room. The user may still need small pieces of tape around hinges, tight corners, curved trim, and hardware.
One common frustration with any combined masking system is correction. If the tape turns crooked, the operator may need to stop the tool, cut or tear the material, lift the strip, and begin again. That pause can erase some of the time saved on a straight run.

Speed, Tape Control, and Masking Results
The real value of a masking tool is not how impressive it looks in a toolbox. The value is the time and effort it can save before paint touches the surface. If loading and correcting the tool takes too long, the benefit becomes smaller.
Speed is only one part of the result. A fast masking pass that leaves gaps can create more work later. The best process is fast enough, controlled enough, and neat enough to protect the surface without turning cleanup into a second project.
Does it make masking faster?
Compared with applying tape and protective film by hand, the M3000 has a clear process advantage on long, repeated runs. The tool is designed to combine two actions. That can reduce the need to switch between a tape roll and a separate film or paper roll.
The advantage is less clear on short runs. For one narrow strip, a manual tape roll may be ready at once. With the M3000, the user must load the tool, confirm the feed, guide the edge, and store it afterward.
A proper comparison should use the same area. For example, select one set of baseboards and one window. First, record the time needed to apply tape and masking material by hand. Then record the time needed to load and use the M3000 on the same type of area.
The comparison should include corrections. Record how many strips were repositioned, how often the film was smoothed, and how much material was discarded. A raw start-to-finish time can hide problems that show up in the final result.
No measured times are available for this product assessment. It would be misleading to state that the M3000 saves a fixed number or percentage of minutes. Results will depend on room size, operator skill, tape choice, surface shape, film width, and the number of corners.
The time saved should increase on larger areas if the tool feeds smoothly. Long window walls, baseboards, and repeated door frames offer more chances to benefit from a combined workflow. Small repairs offer fewer chances.
A useful rule is to compare total project time, not only application time. Include supply loading, corrections, hand work, cleanup, and tool storage. A tool that is slightly slower on the first run may still be useful if it becomes easier after practice.
Does it create clean paint lines?
A clean paint line starts with tape alignment. The tape should sit close to the trim edge without riding onto the area that will receive paint. A dispenser may help keep the tape and film moving together, but the operator still controls the line.
Adhesion is just as important. The surface should be clean, dry, and free from loose dust. Textured walls, rough wood, old caulk, and chipped paint can create paths for paint to bleed under the tape.
The right painter’s tape matters too. Different tapes are made for different surfaces and paint jobs. A tape suitable for a smooth glass edge may not be the best choice for delicate painted walls or rough masonry.
The film must cover enough area to catch overspray, splatter, or roller marks. A narrow strip of film may protect the immediate edge but leave the rest of the window or cabinet exposed. Choose the material based on the risk in the work area.
The M3000 should be most useful on long, straight runs. These areas reward steady movement and a consistent edge. Small, detailed areas may remain awkward because the tool has more bulk than a simple tape roll.
Before painting, press the tape edge down with a clean finger or suitable tape tool. Do not press so hard that you damage a delicate surface. Remove tape according to the tape maker’s guidance, and avoid allowing wet paint to form a thick bridge over the edge.
A dispenser cannot guarantee perfect paint lines. It can help place materials. Surface preparation, tape selection, paint control, and removal technique still decide much of the final finish.

Comfort, Durability, and Everyday Annoyances
A tool can look useful in a product photo and still bother you after five minutes. Masking often involves bending, reaching, kneeling, and holding the tool at odd angles. Comfort is part of performance.
Durability also has two sides. The main body may last for many projects, but small cutting, holding, or feeding parts may receive more wear. Replacement parts and compatible supplies should be considered before purchase.
Is the M3000 easy to handle?
The M3000 is larger than a loose roll of painter’s tape because it must hold or guide more than one material. That extra size may give the user better control over a long run, but it can also make tight spaces harder to reach.
Grip and balance should be judged while the tool is loaded. An empty dispenser may feel light, while a loaded tool may pull in one direction as the film opens. Hold it at the angle used for window masking and overhead trim, not only at waist height.
Loading is part of ease of use. A first-time user needs clear instructions and a simple path for tape and film. If the material must be threaded through several guides, take time to study the diagram before starting the painting job.
Some learning problems may fade with practice. Finding the correct loading path, holding the tool at the right angle, and controlling the film can become easier after a few runs. These are different from design problems that continue even after the user learns the tool.
Maneuverability around corners is a separate issue. A long straight run allows the user to move in one direction. A window corner requires a stop, a turn, and often a short hand-applied piece. Expect the tool to assist with corners, not remove every manual step.
Overhead work can add strain. When masking ceiling trim or the top of a door, the operator may need to support the tool while watching both the tape edge and the film. Short breaks can help reduce wrist and shoulder fatigue.
How To Fix A Tape Dispenser in Under 2 Minutes (Quick & Easy Fixes)
What could frustrate you?
The first possible frustration is loading. If the tape or masking material is not seated correctly, the tool may feed unevenly. Read the current instructions and test a short section before committing to a visible trim line.
Film can fold or bunch when it meets air movement, an uneven surface, or a rushed hand. A folded section may not cover the target area. It may also pull the tape out of line when the user tries to fix it while moving.
Narrow spaces can be difficult. A simple tape roll can fit behind a small bracket or close to a hinge. A larger dispenser may not. This is why a hand masker should be viewed as one tool in a masking kit, not the only tool.
The M3000 also adds bulk compared with manual masking. You must carry it, load it, clean it if adhesive or paint touches it, and find a place to store it. That may be a fair trade for frequent work, but not for a single small project.
Compatibility may cause another problem. If the tool depends on specific tape or film sizes, the owner cannot always use whatever roll is already on the shelf. Check supply cost and local availability before deciding that the tool is inexpensive.
Storage space is easy to ignore. The dispenser, tape, film, paper, spare blades or parts, and instructions should stay together. A tool that is hard to find may not be used when the next painting job starts.
These concerns should not be treated as confirmed failures in every M3000. No direct use was performed for this article. They are practical points to investigate through current documentation, verified user reports, and a short trial on scrap material.
Pros and Cons of the 3M Hand-Masker M3000
The list below separates likely benefits from practical limits. The benefits come from the tool’s intended design. They are not presented as measured results from a personal test.
Pros
- Combines tape and masking-material placement. The central idea is to apply painter’s tape and film or paper in one guided process.
- May reduce repeated hand work. This can matter when a project has many windows, doors, or long baseboard runs.
- Can organize the masking process. Tape and surface protection stay connected instead of being handled as two loose tasks.
- May support cleaner preparation. A steady user may find it easier to keep the film close to the taped edge.
- Can be useful for frequent painters. Professional painters and active DIY users may get more value from repeated use.
- May reduce tool juggling. The operator may not need to switch between a loose tape roll and a separate roll of film as often.
Compare current M3000 offers before buying
Cons
- Requires compatible masking materials. The tool may not accept every tape, paper, or film roll.
- May take practice. Loading and controlling two materials can be less direct than using tape by hand.
- Can be awkward for tiny jobs. Short strips and tight corners may be faster with a manual method.
- Adds another tool to carry. The dispenser needs storage, care, and a place in the painting kit.
- May create waste during learning. Crooked tape or folded film can require removal and replacement.
- May not offer enough value for rare painters. A person who paints once every few years may not recover the cost.
- Cannot replace surface preparation. Dirty, rough, damp, or damaged surfaces can still cause poor tape results.
The first, second, and third limits are reasonable buying concerns based on the tool’s design and normal masking work. They should not be read as claims that every user will experience a failure. The value depends on how often and where the tool is used.
M3000 vs. Manual Masking and Other Hand-Masker Tools
Choosing a masking method is a trade-off. The M3000 may add speed and structure. Manual masking may offer lower cost and better control in tight areas. Another dispenser may offer a different loading system or supply range.
The best option depends on the project, not on the tool with the most features. A painter preparing ten windows has a different need from a homeowner touching up one shelf.
M3000 vs. masking tape applied by hand
The M3000 may be faster for repeated, longer masking runs. Its design brings tape and film together. That can reduce the number of times the user stops to tear tape, move to the film roll, and attach the protective material.
Manual masking is cheaper to start. Most homeowners already own a tape roll, scissors, and paper or film. Manual work is also often easier for tiny areas, curved edges, small repairs, and places where a larger tool cannot fit.
Manual masking can give the user a close view of every inch. That can help on delicate trim or detailed surfaces. The trade-off is more hand movement and more time when the area is large.
The M3000 adds a learning step but may reduce repeated actions later. Manual masking has almost no learning curve, but the process can feel slow when the room has many long edges.
A simple decision test is this: count the long runs in the job. If most of the work involves short pieces and many corners, manual masking may be the better choice. If the work involves many long, straight sections, a dispenser may make more sense.
M3000 vs. other masking dispensers
Other hand masker tools may look similar but differ in loading method, supported material width, tape placement, cutting design, handle shape, and supply availability. Do not assume that one brand’s roll size or accessory will fit another brand’s tool.
When comparing models, check five points:
- Which tape widths are supported?
- Which film or paper widths are supported?
- How is each material loaded?
- Are replacement parts and supplies easy to find?
- What is the total cost after buying the tool and materials?
Handling also matters. Some dispensers may feel better for long wall runs, while others may be easier around windows. A product photo cannot show wrist strain, film drag, or how easy it is to correct a crooked strip.
Supply availability can shape the real price. A low-cost dispenser may become less attractive if its compatible film is hard to find. A tool with widely available supplies may cost less over several projects, even if the first purchase costs more.
Direct comparisons require current specifications. Models change, listings vary, and some online offers may include only a dispenser while others include tape or film. Verify the manufacturer’s documentation and the exact seller listing before comparing prices.

Is the 3M Hand-Masker M3000 Worth the Money?
The answer depends on how much masking you do. A tool that saves a few minutes on one wall may not justify its cost. The same tool may be useful when a painter prepares several rooms, many windows, or repeated jobs each month.
The purchase price is only one part of the calculation. Add the cost of compatible tape, masking film or paper, replacement parts, and storage. Then compare that total with the time you realistically expect to save.
Do not assign a value to time based on hope. Think about your actual projects. If you paint one room every five years, the M3000 may sit unused. If you mask large areas every season, it may become a regular part of your process.
Best for
The M3000 may be a good fit for:
- Professional painters who mask often.
- DIY users tackling several rooms.
- People preparing many windows or doors.
- Painters who work on long, straight trim runs.
- Users who want a more repeatable masking process.
- Anyone willing to learn the loading method and keep compatible supplies on hand.
These users have enough repeated work to benefit from a combined tape and film workflow. They are also more likely to notice the value of less tool juggling and faster preparation.
Not ideal for
The M3000 may not be ideal for:
- People painting one small wall.
- Homeowners with very limited storage.
- Buyers who rarely use masking materials.
- Painters who work mostly in tiny or highly detailed spaces.
- Anyone who wants perfect paint lines without preparing the surface.
- Users who do not want to buy or track compatible supplies.
A manual method may be the better choice for a small, simple project. Ordinary painter’s tape, paper, and patience can produce a strong result when the surface is clean and the tape is placed with care.
Before buying, estimate the number of future projects. Check the current M3000 price, then check the price and availability of compatible tape and film. The tool offers better value when it will be used often enough to spread those costs across many jobs.
Check the latest M3000 price before you decide
Frequently Asked Questions
Is the 3M Hand-Masker M3000 a tape dispenser?
Yes. It is a hand masker tool designed to dispense painter’s tape along with masking film or paper. It is more than a basic tape holder because it is intended to combine tape application and surface protection.
Can it replace all manual masking?
No. Long, straight runs may suit the tool, but corners, narrow gaps, hardware, and detailed areas may still need hand-applied tape. Keep a regular tape roll and small pieces of masking material nearby.
Does it work with any painter’s tape?
Do not assume that it does. Check the exact model instructions and current manufacturer information for supported tape sizes and types. The same rule applies to masking film and paper.
Will it guarantee clean paint lines?
No. Clean lines also depend on surface preparation, tape quality, pressure along the tape edge, paint control, and careful tape removal. A dispenser can assist with placement, but it cannot correct a dirty or rough surface.
Is it good for a first-time DIY painter?
It may be, but a first-time user should practice on a short, low-risk section first. Loading and film control may take time to learn. For one small project, manual masking may be simpler.
How should buyers compare it with another masking dispenser?
Compare material compatibility, loading steps, handle comfort, supply availability, total cost, and the type of masking work you do. Verify current specifications rather than relying only on an old product listing.
Final Verdict: Should You Buy the 3M Hand-Masker M3000?
The 3M Hand-Masker M3000 makes the most sense for people who mask often and want to spend less time preparing surfaces before painting. Its main promise is practical: apply tape and masking film or paper in a more connected workflow.
It is less compelling for a one-off DIY job. Ordinary masking tape and a manual approach may be cheaper, easier to start, and better for small or detailed areas. A larger tool also brings supply costs, storage needs, and a learning curve.
Because no hands-on test was performed for this assessment, there are no claimed test times or personal-use results. Before publishing or buying, confirm the actual test date, supplies used, compatibility details, and any model limits against current 3M documentation.
The deciding factor is use. If you prepare several rooms, many windows, or frequent professional jobs, the M3000 may earn its place in your kit. If you rarely paint, compare the tool and supply costs with the few minutes you expect to save. In the end, the best masking tool is the one that fits your workload, your surfaces, and your patience.
Author note: This product assessment should be paired with an author bio that states relevant painting, decorating, or tool-testing experience. Add original photos of the M3000, its loading setup, and a masked surface where possible. Clearly label manufacturer information, buyer opinions, and firsthand test results as separate sources.